

 To react to the daily news you need to be logged in.


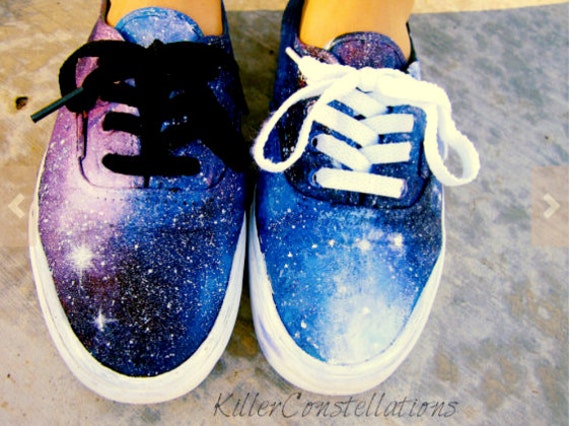
Galaxy Shoes

Cupcake Bath Bombs

Woodland Knits: Knitting pattern book
 A cute collection of knitting patterns can be found HERE
Bluetooth headphones Beanie

Scratch Map


How to assemble the tea-time treat set
What you will need to create the homemade tea-time treat set ~
 • A gift bag
M&M Chocolate Chip Oat Cookies
 Ingredients
 You then want to layer each ingredient into the jar. This recipe fills a 1L jar. You should follow the order of the listed ingredients. Make sure to flatten each layer as you go.
 Once you have layered all the ingredients into the jar, close the lid and decorate with ribbon. It should look something like this.
Gremlins

A Christmas Story

It's A Wonderful Life

Hey everyone! Vintage here.
Before I start anything, I would love to thank my layouter, Krystle, for making this amazing layout!
Sometimes the best gifts are the one’s you personally make. Here’s a tutorial of how to make a Christmas rabbit plushie! I made this with the tutorial + based off the template made from this user on YouTube: (Here)
Step 1:
Download and print out the template. After this, cut out each piece from the template.
Note: I altered the size of the body to be bigger as I want a bigger plushie as I am going to give this to a friend. What I do for this is that I draw around the pre-made pieces in order to get the size I want.
Step 2:
Cut out 2 pieces of the main body/torso, 2 pieces for the ears, 2 pieces of the ears that will be on top, and 2 small hands. There is no specific colors you need to do this for. I just chose colors similar to that of the video. Also, if you want eyes, cut out two pieces of eyes (your choice of color).
Note: To do the eyes, I usually cut out an oval piece and then start cutting in a swirl type pattern until the eyes look round-ish and are a nice size.
Step 3:
To do the scarf you’re going to need to cut a long rectangle and a short one. I based the sizes off the template. You should get something like this:
Step 4:
The next step is to make the face. Line up how you want everything to look. To do the nose, you first go through the back of the piece and then go to the right (or left, depending on how you did it) in a horizontal line. Then put your needle through the back to the bottom of the middle of the line. What you want to do after that is you want to go to one end of the line and do the same for the other end. This will create a triangle shape. When you have the triangle shape down, all you need to do is fill in the small gap in the nose. I did horizontal lines as I went down in order to make it appear neat. When your done doing that, all you need to do is the nose.
Note: The video has a different way to do the face with the eyes that you may have done. If you want make a rabbit with the eyes, you can see how the person did it in the video.
Step 5:
Now to sew the ear pieces together. What you want to do is line up the outer part of the ear (in this case, the pink part) with the main ear piece behind it.
Sewing steps
Go near the very bottom of the edge of the outer piece and put your needle through both of the felts/fabrics.
Go behind the outer piece in order to hide the stitching.
Continue to do that method for both ears. Remember to keep the stitched in between even.
To do the whole ear:
Put the other long piece behind the piece you just sewed. You first put your needle through the front layer.
You then align the second layer, the one behind the front piece, with the front layer. After aligning them together, you put your needle through the second (back) layer.
You pull your needle until you see a loop. You’re going to put your needle through the loop.
Note: Beware though. The thread tends to tangle itself so I suggest straightening out the thread before doing anything further. I also suggest sewing slowly as it will prevent mistakes and tangles.
To do the second stitch, you will do something similar except that you will put your needle through both layers. After that, you will do the same thing with step 6 (previous step). Once you got that down, do that second stitch for the rest of the ears.
Note: For the last picture (the one on the bottom) I decided to put stuffing in the ears before stitching all around. You don’t have to put stuffing there but I chose to because I love fluffy ears.
Step 6:
Align the ears on the back piece of the main piece. When you’ve decided where the ears will go, sew them in place.
Note: What you see in the bottom are the initials of my friend’s name. You can do this too but it may be tricky if you’re new to sewing.
Step 7:
One of the last pieces includes the arms. Align the arms (if you want any) to where you want it to be put. After that, sew it up.
Step 8 (optional):
If you want to make this cute little fella into a key ring, all you have to do is place the ribbon (with the hook) between the ears.
Step 9:
You’re almost done! You will do the same stitches as the ears up to sub steps 5, 6, and 7 to all around the plushie. Before stitching it all up, remember to stuff it with stuffing!
Step 10 (optional):
All that’s left is the scarf which is optional. Put the smaller piece of the scarf on top of the horizontal piece and stitch it onto the main piece. This will create a “T” look. After that, wrap the scarf around the rabbit and sew it onto the rabbit to make sure it doesn’t fall off.
Now you’re done! Hope you enjoyed c:
For sticking around for so long, here's a code:
Merry Christmas/Happy Holidays/Happy New Years!
From,
NewsTeam

Leftover Turkey Sliders
*This is perfect to use all leftovers, there are no real serving sizes since you can load these as much as you want*Cucumber Tomato Appetizers

The Nutcracker and the Mouse King, by E.T.A. Hoffman
This story was based on a short story that soon became a holiday ballet. The short story was published in 1816. The story tells of a tale about a young girl named Marie who saves her nutcracker from the mouse king. She is then taken to the land of sweets by the nutcracker who turns into a prince. In this story, more things happen than in the ballet as it includes more battles and much more in the ending. There are also added bits about Marie’s godfather and the origin of the nutcracker, Marie’s family not believing her about the battle with the mice, and the threats made by the Mouse King to her.
A Christmas Carol, by Charles Dickens
A popular Christmas story that’s been adapted to a variety of movies/films. This story is about Ebenezer Scrooge who despises Christmas and makes his clerk/worker, named Bob Cratchit, work on Christmas Eve. Scrooge is visited by three ghosts that show him the past, present, and the future that will result if he doesn't change his ways.
The Gift of the Magi, by O. Henry
This short story was published in 1906, and it’s about a married couple named Della and Jim. Each give up a favorite possession of theirs in order to buy something special for each other. However they are both struggling with money, and in order to give each other a present, Della cuts her hair and sells it to be able to afford a chain for Jim's watch. Jim sells his watch to buy combs for Della to wear in her beautiful hair.
The Little Match Girl, by Hans Christian Anderson
This is an original Andersen story inspired by a Johan Thomas Lundbye drawing and is loosely based on an incident that happened to Andersen’s mother when she was a child. This story shed light on the oppressed and silent group in Europe which was its children. The story is about a young, poor girl who had lost her grandmother and has to sell all her matches and if she didn’t, she would be beaten for it by her father. But when she lights the matches she see’s something incredible and warming to her.
Rudolph the Red Nosed Reindeer, by Robert L. May
These are just some stories that I’ve found. Hope you enjoyed them and hope you check them out sometime!
Were there any stories that you recognized? Have any other holiday stories? Share them in the comments!
Have a wonderful Christmas and a Happy New Year!
White Chocolate Peppermint Popcorn
M&M Sugar Cookie Bars


