 To react to the daily news you need to be logged in.
What you’ll need:
~Plain shirt {any color is fine, I chose white because I’d be able to see the dye better}
~Tie dye
~Scissors
~Rubber bands
~Plastic bag
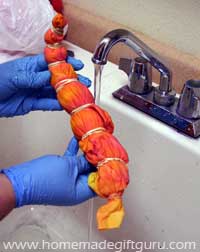
♥Step 1: First, run your shirt under water, then take your shirt and rubber bands, and tie it up any way that you’d like.
♥Step 2: Next, take you tie dye and put it on your shirt. You can use whatever colors you want, and you can make whatever pattern you want. This is your shirt! After you are done with the dye, you need to put your shirt in a plastic bag and it needs to dry and be left alone for 24 hours.

♥Step 3: Take your shirt out of the bag after it’s been 24 hours. If it’s still a little wet, you can put it in the dryer for a little bit. After that, take your scissors and start with the collar. Cut it out so there is no tag and it’s more open; just cut it to how big you want the collar to be.

♥Step 4: Now we’re going to make it into a muscle shirt. Cut out the whole sleeve, and cut down a little bit into the side on the stomach area. If you don't know what you can wear under the shirt, and you don't want people to see your bra or a cami doesn't go up high enough under, you can wear a bandeau or a bustier.

♥Step 5: Now it’s time to make it into a fringe top. This will take a while to make; it took me a half an hour. Don’t rush while making this, even if it is taking a while because you want it to turn out looking good. Carefully cut little strips in the front of the shirt, and as you cut them stretch them out. Cut them up as high as you’d like them to go.

♥Step 6: When the whole front is cut, go onto the back. Do the same to the back as you did the front, but be extra careful, because you don’t want to cut any of the ones from the front off. 
♥Step 7: When the fringe on both sides is done, take the collar and sleeves and pull them/stretch them out because that will make them fold in a little bit and it won’t look like it was just cut.
♥Step 8 {Optional}: If you don’t like how the bottom of the fringe looks because it’s square and you can see where it was sewn, you can tie the ends and then cut any fabric left under the knot.

And then this is what the final product should look like. As you can see, I'm just wearing a Bandeau with mine. 
This would be great to wear anywhere, but especially for summer you can wear it over your bathing suit! Hope you enjoyed this DIY, and if you make this, make sure to post the pictures of the finished products so I can see them!
~Bailey

| News archive | |||
| Forum...? Thread...? | 23-02-2013 06:03 | ||
| Staying Healthy and Active! | 22-02-2013 09:13 | ||
| 22nd February changed my Life... | 22-02-2013 08:54 | ||
| You are beautiful | 22-02-2013 01:31 | ||
| 10 Tips to a Clutter-free Bedroom. | 20-02-2013 09:31 | ||
| Nature ♥ | 19-02-2013 01:17 | ||
| Vampire History and Culture | 18-02-2013 18:08 | ||
| New York Fashion Week | 17-02-2013 14:33 | ||
| 4 Tips.. | 15-02-2013 15:23 | ||
| Happy Valentine's Day! | 14-02-2013 03:20 | ||
| February 12th News! | 12-02-2013 20:50 | ||
| Snow White | 11-02-2013 13:07 | ||
| Chinese New Year | 10-02-2013 14:30 | ||
| Community of VP! | 09-02-2013 22:41 | ||
| Unrelated Twins | 07-02-2013 22:45 | ||