Hi there, guys! As you got already used to (I think), Iu's here with a new article, since it's Tuesday and practically the week just started!
Summer's already here, as the summer break is too! I remember that time when I wrote my first article, „Summer vibes”, and talked about how summer it's so close. Now it's really great to think about it.
So, as you can see, today I'll talk about some crafts I found, which I think are pretty cool and worth making, especially that they are pretty simple and suit that „summer-y” feel.
Thank DEAR for this stunning layout, as always!
2. Style yourself » two ways
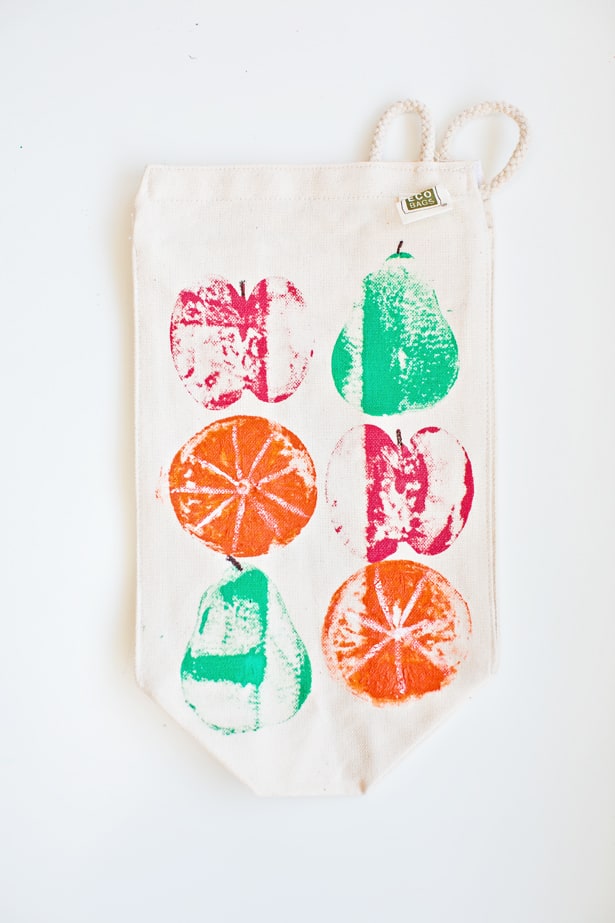
I. »Fruity or leguminous stamped bags or everything you have on hand!
For this, you'll need:
-fabric bag (if you want to; you can use t-shirts too, almost everything)
-paint, which can be fabric paint or just normal paint
-foam brushes
-fruits or vegetables
The steps you need to follow:
1. Lay your materials out, then cut the fruits/vegetables in half. You may need to „practice” with stamping a little bit, just to be sure how the prints will turn out after.

2. Decide then where all the fruits will go on the materials. Using the foam brush, cover each half of the fruit/vegetable entirely with paint.
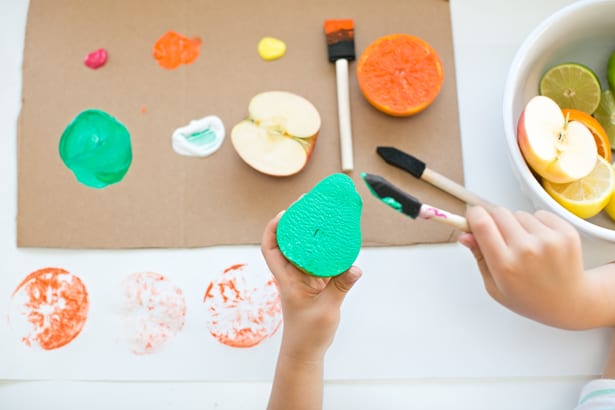
3. Now you can press each fruit down. Do it firmly, and when you'll remove it from there, do it slowly. Repeat it for how many times you want to!
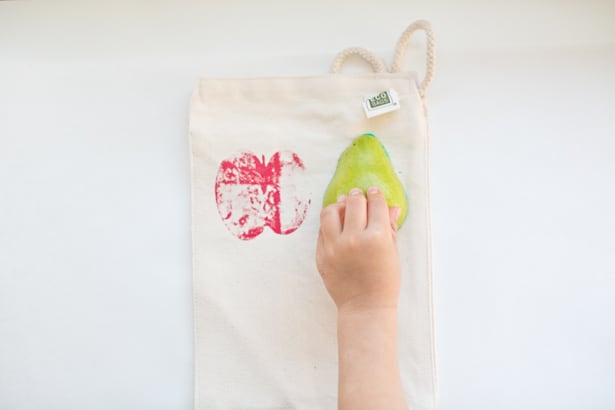
4. Let the paint dry, and there you are! You must have a new, stylish thing to wear!
II. »Sharpie tie dye, because why making such a mess with the classic tie dye project, while these are very easy to make and also fashionable too?
The things you need:
-sharpie markers in light blue, red and yellow nuances
-plain white t-shirt
-large embroidery hoop (ten inches)
-eye-droppers
-plate
-small bowl
-70% isopropyl rubbing alcohol
-retayne (optional, if you want the colours to last longer)
The steps you need to follow:
1. Use the embroidery hoop to tighten a section of fabric at the front of the shirt.
2. Use your sharpies to draw all over the shirt. Add a good layer of color, to be sure it'll spread nicely.
3. When you're done, slip a plate inside the shirt, under the embroidery hoop, to catch any rubbing alcohol that may seep through. Now, you can pour rubbing alcohol into a small bowl. Using an eye dropper, begin dropping rubbing alcohol on the t-shirt. Blend it good! You can also spray the retayne over, so the colours will fix better!
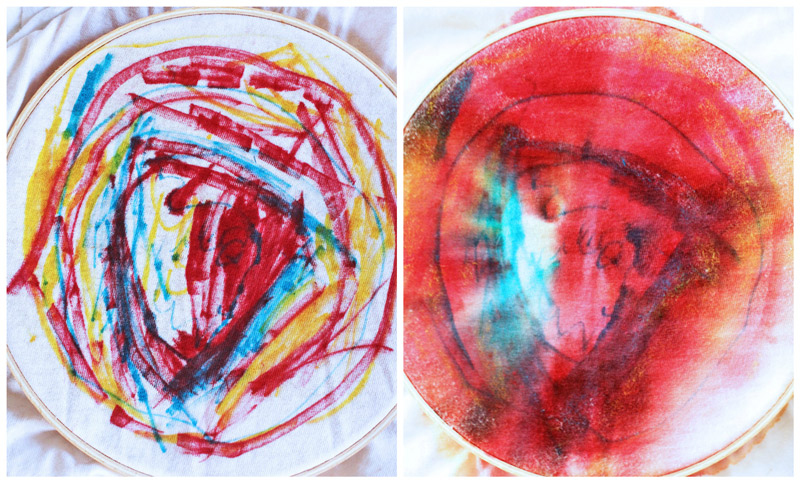
4. After it dries, you can iron your new, sophisticated t-shirt!
1. Slime!
Even though it seems childish, why not to try making it? It seems super simple and also it's very fun, so, you know, that inner child won't die.
You'll need:
-1/2 cup liquid starch
-1/2 cup water
-1/2 cup liquid glue
-liquid watercolors or food coloring
-glitter (optional)
The steps you need to follow are quite simple:
1. You start by pouring the water and the liquid glue into a bowl, then mix until they are combined.

2. Now you can add the watercolour/food colouring to the glue-water mixture. Mix this well, too.

3. If you like glitter (like I do so), add it now. Mix everything up and well again.

4. Add the liquid starch and stir well.

5. Once the mixture begins to thicken and climb up to your spoon, you can knead it well by using your hands.

6. Check the consistency. It should be nice and stretchy, but not stringy or super sticky.

If your slime didn't turn out how you were hoping, it's a really easy fix in there! Just go in here for details!
3. Kaleidoscope
Why not? You'll therefore have something to look at when you're bored all the way, and also it's very pretty! Just to have it there as a decoration brights up things!
You'll need for making it:
-metal ruler
-thin acrylic mirror (or a magnetic locker mirror)
-box cutter
-masking tape
-cardboard paper towel roll tube
-empty plastic vegetable or fruit container
-fine permanent marker
-paper
-transparent colorful beads or “gems”
-contact paper in whatever pattern you'd like
-glitter (optional)
-glue (optional)
Keep in mind that this craft is made with the measurements of a standard cardboard paper towel roll tube (11 inches with a diameter of approximately 1 ¾ inches)!
The steps you need to follow:
1. Mark the width of the mirror on both sides at 1 ½ inches, 3 inches and 4 ½ inches. Cut the mirror into 3 strips that are 1 ½ wide. The mirror here was slightly too small and rounded to cut three strips, so there were used 2 mirrors and cut off the curved corners for this step.

Lay the 3 strips side by side upside down, leaving a small gap between them. Tape the mirrors together using masking tape and set the prism aside.

2. Measure out the length of your mirror strip and add an inch to the measurement also. Take this measurement and mark it along the circumference your cardboard tube. Connect the markings all around the tube and carefully cut the cardboard roll with your box cutter.

3. Lay the end of the cardboard tube flat on the back of the contact paper and trace a circle around it (if your tube is not perfectly round, you may have to make some freehand adjustments). Cut approximately 1 inch around the traced circle, then cut little notches or “rays” around the circle so that you end up with a “starburst.” Cut a triangle or circle in the center of the paper. Peel away the backing and lay the starburst on your work surface, sticky side up, and center your cardboard tube on top of it. Working your way around the tube, stick the notches of your sunburst against its edge, adding tape to secure them.

4.Cut out the bottom of your empty plastic container. Using your cardboard tube or another circular object as a template, trace two circles on the plastic with your permanent marker. Find another circular object that is approximately a ½ inch larger than your traced circles and draw around the previous ones using the same technique. Cut around the each of the larger circles using scissors. With one of the circles, cut notches all the way to the inside of the inner circle so that resembles a “gear” — we’ll call this Lens A. With the other circle, cut notches to the outside tracing of the inner circle — we’ll call this Lens B. Lay your lenses flat against the table and bend the notches upwards.

5. Slide your triangular prism inside your tube. Take Lens A and place it inside your tube against the edges of your prism, notches facing up. Place your selected beads on top of the plastic lens. Cap your gems using Lens B, notches facing down, and secure it to the tube with masking tape. Give it a spin!

At the end you can customize it how you want to, by using the contact paper! You can also put a little glue on the margins, and then roll them in glitter!
Now you have your own kaleidoscope!


 Private
 Private
 Private
 Private
 0
0 0
0 0
0 0
0